Table of Contents
How to Setup an Email Account in Outlook 2007/2010
Initial Setup
If you have not already done so, create the desired email account in your cPanel interface under Email Accounts.
- cPanel can be accessed through http://yourdomain.com/cpanel. If you do not know your cPanel logins, you can either reset them through the WHM (for VPS/dedicated clients), or contact our support.
- Make sure you write down your password as it will be used later. Note that passwords are always case-sensitive but your email address is not.
Outlook Configuration
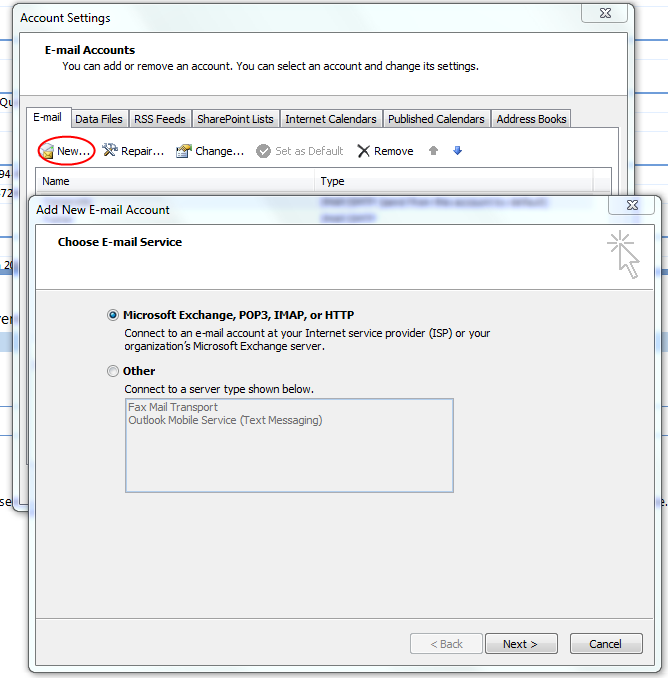
Start Outlook and navigate to Tools → Account Settings and click the New… button.

Click Next on the window that comes up. Select the Manually configure server settings or additional server types checkbox and click Next and again on the next page (Internet E-mail should be selected).
Details should be entered on this page as follows:
- Your Name: This is what people will see in the From line when you send emails. Typically this is your first and last name, a nickname, or your business title. It is up to you what you want to put here.
- E-mail Address: This is the full email address of the account you just set up.
- Account Type: We recommend IMAP (see note below), but you can also choose POP3 if you wish. Whichever is selected, the rest of the settings are still the same.
- Incoming Mail Server: This is simply mail.yourdomain.com
- Outgoing Mail Server: Same as Incoming.
- User Name: This is your full e-mail address for the account in question.
- Password: The password you created for the e-mail account in cPanel earlier.
- Leave the box for Secure Password Authentication (SPA) unchecked.
You can now click the Test Account Settings button to ensure you have typed everything correctly. Both tests should result in success. If the outgoing server test fails and you are certain you have typed everything correctly, please see our ISP port block section below.
Click Next then Finish. That's it, you are now done!
SSL Setup
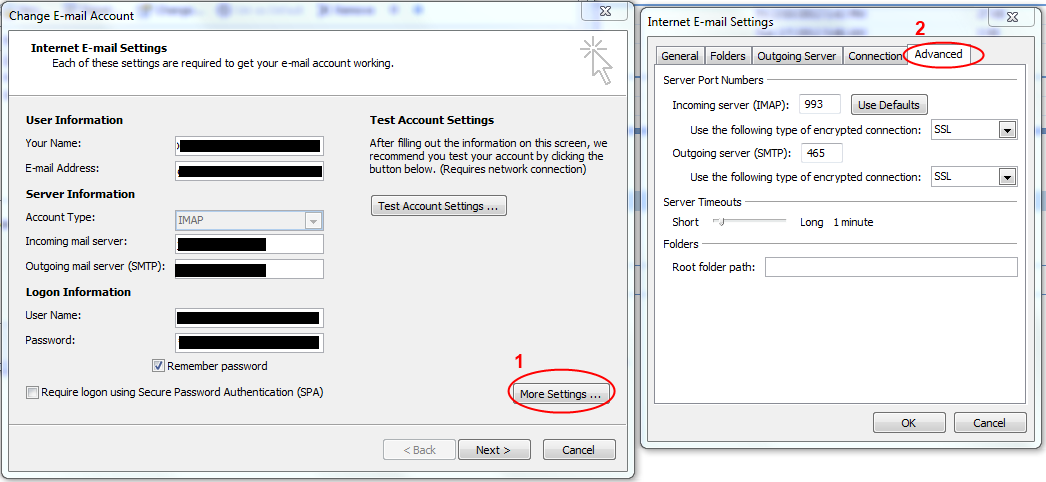
To enable SSL for your incoming an outgoing servers, click the More Settings button while on the main account setup page. Select the Advanced tab and change the following settings (yours should look similar to the image below when done):
- Incoming Server (IMAP): 993
- Use the following type of encrypted connection: SSL
- Outgoing Server (SMTP): 465
- Use the following type of encrypted connection: SSL

Click OK, test your settings, and then finish the setup. Note that unless you have purchased an SSL certificate for your mail server, you will get a warning that your certificate was unable to be verified when starting Outlook. This is normal, and your connection is still secure! If you wish to purchase a certificate for your mail server to guarantee the identity of your mail server, please contact us.
ISPs who Block Port 25
Many residential ISPs block the SMTP (outgoing) port 25 in an effort to eliminate spam originating on their networks. This poses a problem for individuals who have custom mail servers, but fortunately there is a workaround! The first would be to enable SSL for your outgoing mail server as described in the SSL setup section above.
The second is to use an alternate port for your SMTP server. Depending on the type of client you are will determine how this is done.
Shared Clients
Select the More Settings button, navigate to the Advanced tab, and change the Outgoing Server (SMTP) value to 26. That's it! Refer to the image above under SSL Setup for a visual on how to get to this screen.
VPS/Dedicated Clients
The extra step here is to enable an extra copy of your mail server (Exim) on another port. To do so, log into the WHM of your server (http://yourdomain.com/whm) and navigate to the Service Manager section. Tick the box under Enabled for Exim on another port and change it to your desired port (26 is default/preferred). Once this is saved, follow the instructions for shared clients above!